【Vue.js】WP REST APIで取得した投稿データで一覧ページを作成する
※本ページのリンクにはプロモーションが含まれています。
こんにちは、Ryohei(@ityryohei)です!
本記事では、Vue.jsでWP REST APIで投稿データを取得して一覧ページを作成する方法をご紹介しています。

Vue.jsで、WP REST APIでで投稿データを取得して一覧ページを作成したいんだけど、良い方法ないかな?
上記の疑問にお答えします。
本記事ではお手軽にCDN版を使した方法をご紹介していきたいと思います。
では、解説していきます。本記事で作成するページ
本記事では下記のような投稿一覧ページを作成します。投稿が15件縦並びになっていて、「前へ・次へ」をクリックすると同一ページ内で投稿が更新されます。
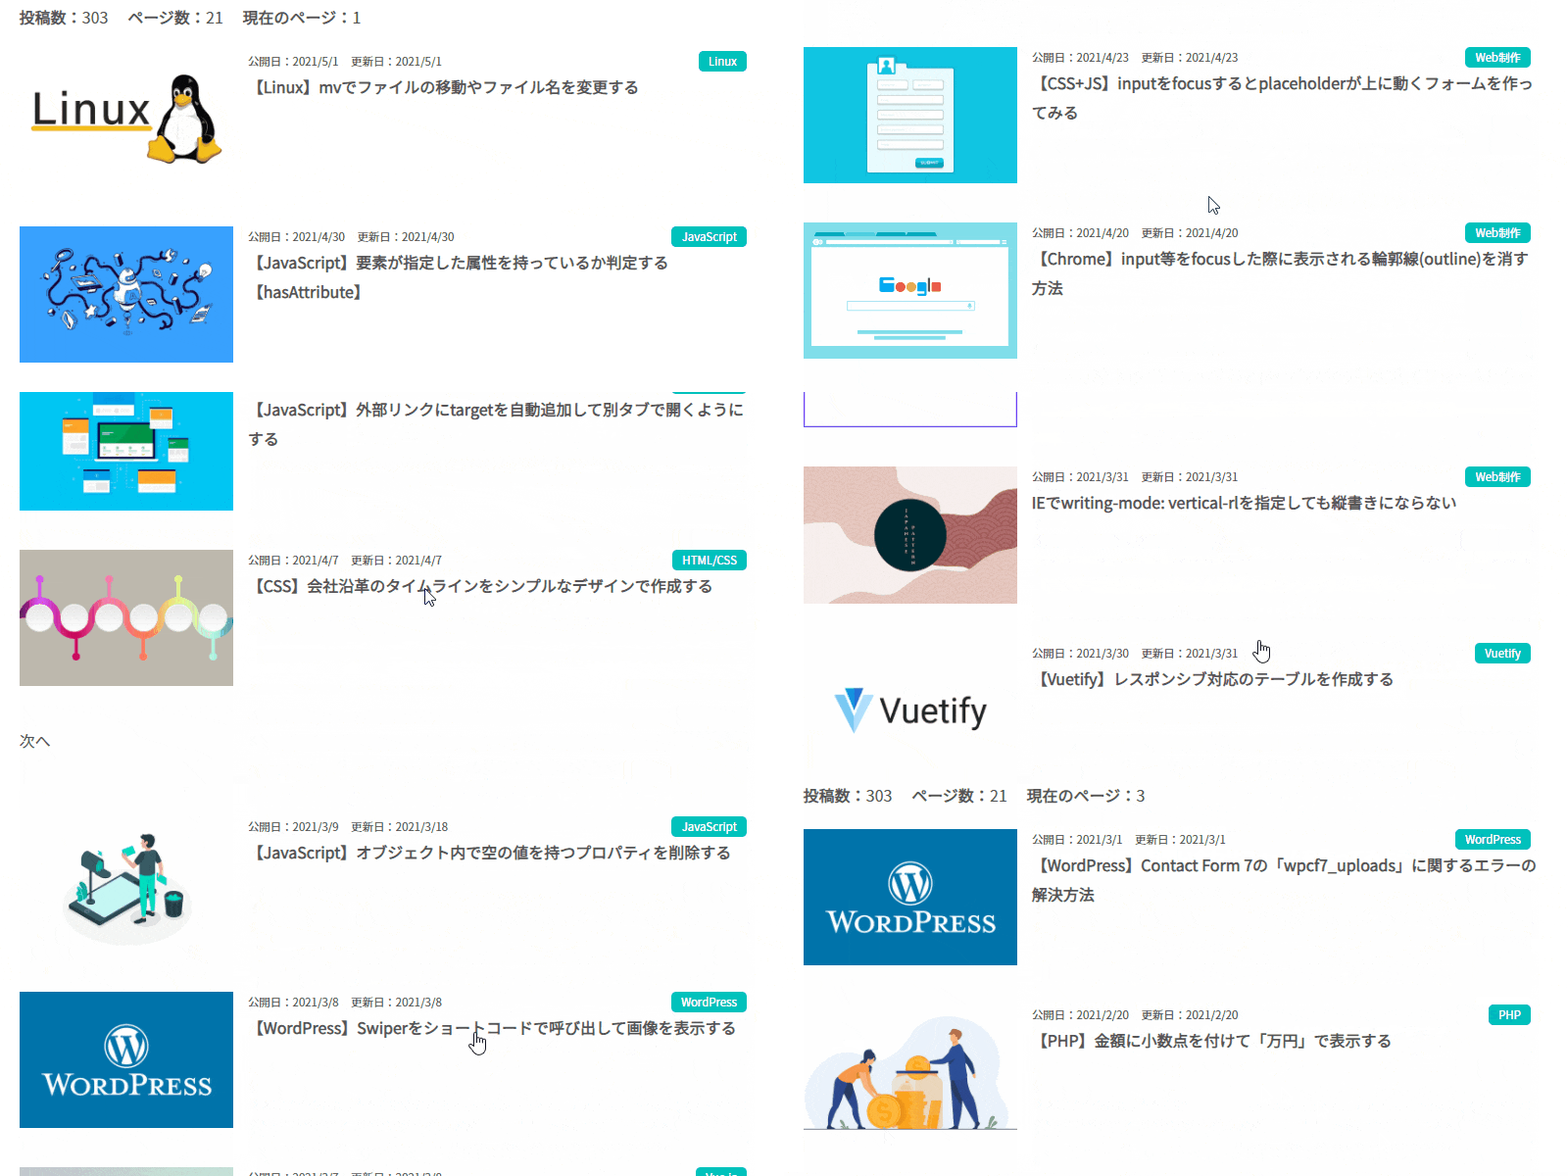
上記のようなページを作成したい方の参考にしていただければ幸いです!
WP REST APIのデータを取得するページを作成する
WP REST APIのデータを取得するページを作成します。Vue.jsとaxiosでWP REST APIからJSONを取得するので、Vue.js本体とaxiosモジュールをCDNで読み込みます。
作成するページの全体像は下記のようなイメージです。Vueを適用する要素名等は環境に合わせて変更してください。
<!-- HTML -->
<div id="posts">
</div>

<!-- JS -->
<script src="https://cdnjs.cloudflare.com/ajax/libs/vue/2.6.12/vue.min.js"></script>
<script src="https://cdnjs.cloudflare.com/ajax/libs/axios/0.21.1/axios.min.js"></script>
<script>
new Vue({
    el: '#posts'
})
</script>
以上で準備は完了です。次項から作成したページに処理を追記していきます。
WP REST APIで投稿データのJSONを取得する
まずは投稿データの取得から。
WP REST APIで投稿データを取得する方法はとてもシンプルです。ドキュメントのトップページにあるように/wp-json/wp/v2/postsにGETリクエストを送るだけで投稿データを取得することができます。
Vueに組み込むと下記のようになります。
new Vue({
    el: '#posts',
    data: {
        url: 'https://into-the-program.com', //WPのhome_urlを指定
        perpage: 15, //投稿データ取得件数
        posts: '', //投稿データ
        errors: '', //エラー
    },
    created() {
        this.getPosts();
    },
    methods: {
        //投稿データ取得
        getPosts: function(){
            axios.get(this.url + '/wp-json/wp/v2/posts?_embed', {
                params: {
                    per_page: this.perpage,
                }
            })
            .then(response => {
                this.posts = response.data
            })
            .catch(error => {
                this.errors = error
            })
        },
    }
})
ほとんどVue + axiosのテンプレート的な近い形なので問題ないと思いますが、GETパラメータの_embedについて、なんだこれは!という方もいらっしゃると思いますので、少しだけ補足しておきます。
_embedについて
GETリクエストのクエリ文字列に_emdebを含めると、投稿に関連するリソースのリンクがJSONに含まれます。詳しい仕様につきましては下記のドキュメントをご参照いただければと思いますが、要するに投稿に使用しているアイキャッチ画像やカテゴリーのリンクといった情報も一緒にください、と依頼するパラメータです。
試しに/wp-json/wp/v2/postsで取得したJSONの中から下記の投稿内容を見てみます。
下記はWP REST APIの/wp-json/wp/v2/postsで取得した複数ある中の1件分の投稿データです。投稿IDや投稿者名、投稿タイトルに本文など多くの情報が記載されています。投稿に関する最低限必要な情報がまとめられています。
{
    "id": 6921,
    "date": "2021-05-01T00:27:35",
    "date_gmt": "2021-04-30T15:27:35",
    "guid": {
        "rendered": "https://into-the-program.com/?p=6921"
    },
    "modified": "2021-05-01T00:30:30",
    "modified_gmt": "2021-04-30T15:30:30",
    "slug": "linux-mv",
    "status": "publish",
    "type": "post",
    "link": "https://into-the-program.com/linux-mv",
    "title": {
        "rendered": "記事タイトル"
    },
    "content": {
        "rendered": "<p>補文</p>",
        "protected": false
    },
    "excerpt": {
        "rendered": "<p>概要</p>",
        "protected": false
    },
    "author": 10,
    "featured_media": 6929,
    "comment_status": "closed",
    "ping_status": "closed",
    "sticky": false,
    "template": "",
    "format": "standard",
    "meta": [],
    "categories": [
        7
    ],
    "tags": [],
    "_links": {
        "self": [
            {
                "href": "https://into-the-program.com/wp-json/wp/v2/posts/6921"
            }
        ],
        "collection": [
            {
                "href": "https://into-the-program.com/wp-json/wp/v2/posts"
            }
        ],
        "about": [
            {
                "href": "https://into-the-program.com/wp-json/wp/v2/types/post"
            }
        ],
        "author": [
            {
                "embeddable": true,
                "href": "https://into-the-program.com/wp-json/wp/v2/users/10"
            }
        ],
        "replies": [
            {
                "embeddable": true,
                "href": "https://into-the-program.com/wp-json/wp/v2/comments?post=6921"
            }
        ],
        "version-history": [
            {
                "count": 0,
                "href": "https://into-the-program.com/wp-json/wp/v2/posts/6921/revisions"
            }
        ],
        "wp:featuredmedia": [
            {
                "embeddable": true,
                "href": "https://into-the-program.com/wp-json/wp/v2/media/6929"
            }
        ],
        "wp:attachment": [
            {
                "href": "https://into-the-program.com/wp-json/wp/v2/media?parent=6921"
            }
        ],
        "wp:term": [
            {
                "taxonomy": "category",
                "embeddable": true,
                "href": "https://into-the-program.com/wp-json/wp/v2/categories?post=6921"
            },
            {
                "taxonomy": "post_tag",
                "embeddable": true,
                "href": "https://into-the-program.com/wp-json/wp/v2/tags?post=6921"
            }
        ],
        "curies": [
            {
                "name": "wp",
                "href": "https://api.w.org/{rel}",
                "templated": true
            }
        ]
    },
}
下記はGETリクエストのパラメータに_embedを含めた際に追加取得することができるデータです。 _embeddedが追加されるデータになります。
"_embedded": {
    "author": [
        {
            "id": 10,
            "name": "UserName",
            "url": "",
            "description": "",
            "link": "https://into-the-program.com/author/username/",
            "slug": "username",
            "avatar_urls": {
                "24": "https://secure.gravatar.com/avatar/23941beafb29041c912fa1b15856815d?s=24&d=mm&r=g",
                "48": "https://secure.gravatar.com/avatar/23941beafb29041c912fa1b15856815d?s=48&d=mm&r=g",
                "96": "https://secure.gravatar.com/avatar/23941beafb29041c912fa1b15856815d?s=96&d=mm&r=g"
            },
            "_links": {
                "self": [
                    {
                        "href": "https://into-the-program.com/wp-json/wp/v2/users/10"
                    }
                ],
                "collection": [
                    {
                        "href": "https://into-the-program.com/wp-json/wp/v2/users"
                    }
                ]
            }
        }
    ],
    "wp:featuredmedia": [
        {
            "id": 6929,
            "date": "2021-05-01T00:27:22",
            "slug": "linux",
            "type": "attachment",
            "link": "https://into-the-program.com/linux/",
            "title": {
                "rendered": "linux"
            },
            "author": 10,
            "caption": {
                "rendered": ""
            },
            "alt_text": "",
            "media_type": "image",
            "mime_type": "image/jpeg",
            "media_details": {
                "width": 940,
                "height": 600,
                "file": "linux.jpg",
                "sizes": {},
                "image_meta": {
                    "aperture": "0",
                    "credit": "",
                    "camera": "",
                    "caption": "",
                    "created_timestamp": "0",
                    "copyright": "",
                    "focal_length": "0",
                    "iso": "0",
                    "shutter_speed": "0",
                    "title": "",
                    "orientation": "0",
                    "keywords": []
                }
            },
            "source_url": "https://into-the-program.com/uploads/linux.jpg",
            "_links": {
                "self": [
                    {
                        "href": "https://into-the-program.com/wp-json/wp/v2/media/6929"
                    }
                ],
                "collection": [
                    {
                        "href": "https://into-the-program.com/wp-json/wp/v2/media"
                    }
                ],
                "about": [
                    {
                        "href": "https://into-the-program.com/wp-json/wp/v2/types/attachment"
                    }
                ],
                "author": [
                    {
                        "embeddable": true,
                        "href": "https://into-the-program.com/wp-json/wp/v2/users/10"
                    }
                ],
                "replies": [
                    {
                        "embeddable": true,
                        "href": "https://into-the-program.com/wp-json/wp/v2/comments?post=6929"
                    }
                ]
            }
        }
    ],
    "wp:term": [
        [
            {
                "id": 7,
                "link": "https://into-the-program.com/category/linux/",
                "name": "Linux",
                "slug": "linux",
                "taxonomy": "category",
                "_links": {
                    "self": [
                        {
                            "href": "https://into-the-program.com/wp-json/wp/v2/categories/7"
                        }
                    ],
                    "collection": [
                        {
                            "href": "https://into-the-program.com/wp-json/wp/v2/categories"
                        }
                    ],
                    "about": [
                        {
                            "href": "https://into-the-program.com/wp-json/wp/v2/taxonomies/category"
                        }
                    ],
                    "wp:post_type": [
                        {
                            "href": "https://into-the-program.com/wp-json/wp/v2/posts?categories=7"
                        }
                    ],
                    "curies": [
                        {
                            "name": "wp",
                            "href": "https://api.w.org/{rel}",
                            "templated": true
                        }
                    ]
                }
            }
        ],
        []
    ]
}
投稿に関連するリソースのリンク(アイキャッチ画像やカテゴリー等)が含まれていることが確認できます。_embedをパラメータに含めることでこれらのデータの取得が可能になります。
_embedをGETパラメータに指定する注意点として、上でご紹介したJSONを見てわかる通り、データの中にはユーザー情報が含まれています。プラグイン等でWP REST API経由のユーザー情報へのアクセスを拒否している場合は_embedによるデータの取得できないので、ご注意ください。
では、本題に戻りまして、取得したデータをHTMLに出力する処理を作成していきます。
取得したデータで投稿一覧ページを作成する
取得したデータを使用して一覧ページを作成します。表示する内容はブログ等でよく見かける、アイキャッチ画像、タイトル、概要、公開日or更新日、カテゴリーを出力してみます。アイキャッチ画像とカテゴリ―は、_embedパラメータで追加取得したデータを使います。
<!-- HTML -->
<div id="posts">
    <article class="post" v-for="post in posts">
        <figure class="thumbnail">
            <img :src="post._embedded['wp:featuredmedia'][0].source_url" alt="">
        </figure>
        <div class="content">
            <div class="info">
                <!-- 公開日・更新日 -->
                <div class="posted">
                    <time class="date" :datetime="post.date">公開日:{{ dateFormat(post.date) }}</time>
                    <time class="modified" :datetime="post.modified">更新日:{{ dateFormat(post.modified) }}</time>
                </div>
                <!-- カテゴリ― -->
                <div class="terms">
                    <div class="term" v-for="term in post._embedded['wp:term'][0]">
                        <a :href="term.link">{{ term.name }}</a>
                    </div>
                </div>
            </div>
            <!-- タイトル -->
            <h2 class="title">
                <a :href="post.link">{{ post.title.rendered }}</a>
            </h2>
            <!-- 投稿概要(デモでは出力していない箇所) -->
            <p class="excerpt">{{ post.excerpt.rendered }}</p>
        </div>
    </article>
</div>

<!-- JS -->
<script src="https://cdnjs.cloudflare.com/ajax/libs/vue/2.6.12/vue.min.js"></script>
<script src="https://cdnjs.cloudflare.com/ajax/libs/axios/0.21.1/axios.min.js"></script>
<script>
new Vue({
    el: '#posts',
    data: {
        url: 'https://into-the-program.com',
        perpage: 15,
        posts: '',
        errors: '',
    },
    created() {
        this.getPosts();
    },
    methods: {
        getPosts: function(){
            axios.get(this.url + '/wp-json/wp/v2/posts?_embed', {
                params: {
                    per_page: this.perpage,
                }
            })
            .then(response => {
                this.posts = response.data
            })
            .catch(error => {
                this.errors = error
            })
        },
        dateFormat: function(postDate){
            const date = new Date(postDate)
            const year = date.getFullYear()
            const month = date.getMonth() + 1
            const day = date.getDate()
            return year + '/' + month + '/' + day
        },
    }
})
</script>
出力している内容はコメントにある通りです。公開日と更新日はJSONデータのままでは扱いにくいので、methodのdateFormatでフォーマットを変更しています。
一応ここまでの内容で投稿一覧ページの作成は完了です。しかし、このままではパラメータに指定しているper_pageの件数(最大100件)の投稿数しか表示することができませんので、ページネーションを用意する必要があります。
vue-routerを使用してページネーションを組み込むのも良いのですが、ここでは簡単に、前へ・次へのボタンを用意して、同一ページ内で投稿一覧を更新する方法をご紹介したいと思います。
投稿一覧の更新処理を作成する
簡単なページネーションを組み込んだものが下記になります。追加した行にはコメントを記載しております。全投稿数とトータルページ数はレスポンスヘッダーから取得することができるため、そちらを利用しています。
<!-- HTML -->
<div id="posts">
    <!-- 投稿一覧情報 -->
    <dl class="posts-info">
        <dt>投稿数:</dt>
        <dd>{{ total }}</dd>
        <dt>ページ数:</dt>
        <dd>{{ totalpages }}</dd>
        <dt>現在のページ:</dt>
        <dd>{{ page }}</dd>
    </dl>
    <article class="post" v-for="post in posts">
        <figure class="thumbnail">
            <img :src="post._embedded['wp:featuredmedia'][0].source_url" alt="">
        </figure>
        <div class="content">
            <div class="info">
                <!-- 公開日・更新日 -->
                <div class="posted">
                    <time class="date" :datetime="post.date">公開日:{{ dateFormat(post.date) }}</time>
                    <time class="modified" :datetime="post.modified">更新日:{{ dateFormat(post.modified) }}</time>
                </div>
                <!-- カテゴリ― -->
                <div class="terms">
                    <div class="term" v-for="term in post._embedded['wp:term'][0]">
                        <a :href="term.link">{{ term.name }}</a>
                    </div>
                </div>
            </div>
            <!-- タイトル -->
            <h2 class="title">
                <a :href="post.link">{{ post.title.rendered }}</a>
            </h2>
            <!-- 投稿概要 -->
            <p class="excerpt">{{ post.excerpt.rendered }}</p>
        </div>
    </article>
    <!-- ページネーション -->
    <div class="pagination">
        <a v-if="page > 1" v-on:click="pagination('prev')">前へ</a>
        <a v-if="page < totalpages" v-on:click="pagination('next')">次へ</a>
    </div>
</div>

<!-- JS -->
<script src="https://cdnjs.cloudflare.com/ajax/libs/vue/2.6.12/vue.min.js"></script>
<script src="https://cdnjs.cloudflare.com/ajax/libs/axios/0.21.1/axios.min.js"></script>
<script>
new Vue({
    el: '#posts',
    data: {
        url: 'https://into-the-program.com',
        perpage: 15,
        posts: '',
        errors: '',
        page: 1, //現在のページ
        total: '', //全投稿件数
        totalpages: '', //全ページ数
    },
    created() {
        this.getPosts();
    },
    methods: {
        getPosts: function(){
            axios.get(this.url + '/wp-json/wp/v2/posts?_embed', {
                params: {
                    per_page: this.perpage,
                    page: this.page,
                }
            })
            .then(response => {
                this.posts = response.data
                this.total = response.headers['x-wp-total'] //レスポンスヘッダーから投稿件数取得
                this.totalpages = response.headers['x-wp-totalpages'] //レスポンスヘッダーからトータルページ数取得
            })
            .catch(error => {
                this.errors = error
            })
        },
        pagination: function(page){
            //prevであればpageに1を減算
            if(page === 'prev'){
                this.page-=1
            }
            //nextであればpageに1を加算
            if(page === 'next'){
                this.page+=1
            }
            //#postsまでスクロール
            document.querySelector('#posts').scrollIntoView()
            //一覧を更新する
            this.getPosts();
        },
        dateFormat: function(postDate){
            const date = new Date(postDate)
            const year = date.getFullYear()
            const month = date.getMonth() + 1
            const day = date.getDate()
            return year + '/' + month + '/' + day
        },
    }
})
</script>
これで冒頭でご紹介したデモ内容の完成です!
最後に
今回はVue.jsとWP REST APIを使用して簡単に投稿一覧ページを作成してみました。しっかりとしたSPAサイトを作りたい場合はもちろんVue CLIで構築した方が良いですが、CDN版でも結構良いところまで対応できるんじゃないかなと思います。
Vueは気になってるけど、Vue CLIからはとっつきにくいと感じられている方は、まずはCDN版のVue.js + axiosとWordPressのWP REST APIを使用して、普段構築しているサイトをVueに対応するところから入門してみても良いかもしれません。
以上、Vue.jsとWP REST APIで取得した投稿データで一覧ページを作成する方法のご紹介でした!


